

Tiling can transform a space, adding durability and a timeless aesthetic to any room. Whether working with ceramic, porcelain, or stone, achieving a professional finish requires the right tools. As more homeowners take on DIY projects, understanding the essential tools for tiling becomes crucial. This guide explores the eight must-have tiling tools that ensure a high-quality installation, offering both novices and seasoned DIYers a valuable resource.
Timing and Location of the DIY Tiling Trend
The rise in DIY home improvement projects has been notable in recent years, particularly during and after the COVID-19 pandemic. With more people spending time at home, many have taken the opportunity to enhance their living spaces. This trend has been observed globally, with significant upticks in countries like the UK and the US, where home improvement stores reported increased sales in tiling materials and tools. The versatility of tiles in kitchens, bathrooms, and other high-traffic areas has made them a popular choice for homeowners seeking to upgrade their homes with minimal professional intervention.
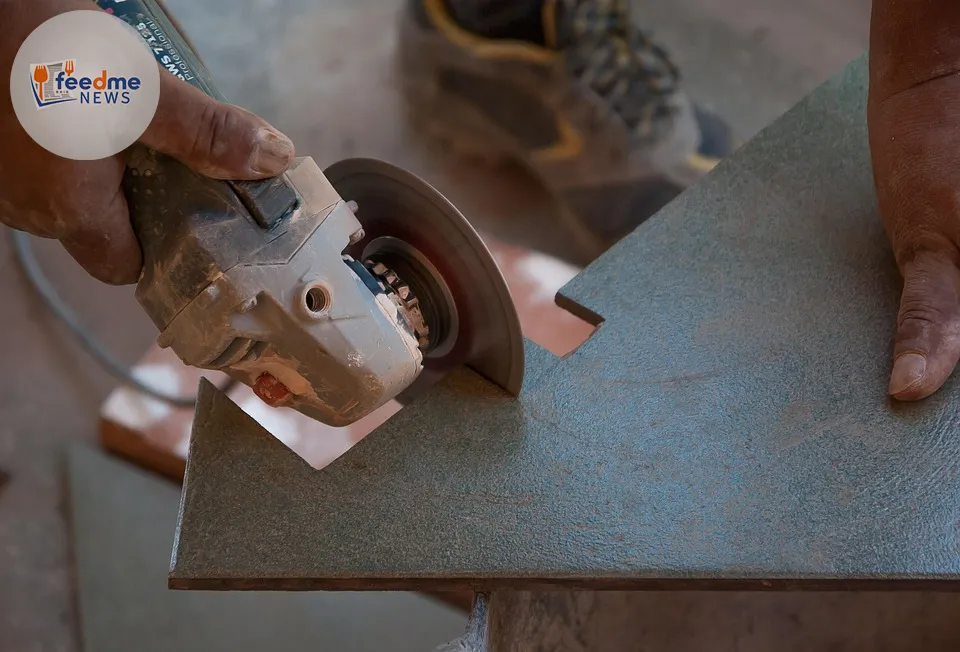
The Importance of a Quality Tile Cutter
A tile cutter is the backbone of any tiling project. It allows for precise cuts, ensuring tiles fit perfectly into the designated space. Manual tile cutters are ideal for straight cuts, while electric versions are necessary for more intricate designs or harder materials like stone. According to home improvement expert John Smith, “Investing in a quality tile cutter is crucial. It not only speeds up the process but also reduces the risk of breakage, saving both time and money.”
The choice of a tile cutter depends on the type of tile being used. For instance, ceramic tiles, which are easier to cut, might only require a manual cutter. In contrast, porcelain tiles, known for their durability, often necessitate an electric cutter for clean, precise cuts.
Grout Float: Ensuring a Seamless Finish
A grout float is indispensable for applying grout between tiles. It helps achieve a smooth finish, filling gaps and ensuring tiles stay firmly in place. The tool, typically made of rubber, allows for even distribution without scratching the tiles. Professional tiler Sarah Johnson advises, “Using a rubber grout float ensures that grout is applied evenly, which is vital for both appearance and durability.”
The technique of using a grout float involves spreading the grout diagonally across the tiles to fill the joints adequately. This method prevents the grout from being pulled out of the joints during the application process.
Tile Levelling Systems for Perfect Alignment
Tile levelling systems have revolutionised the DIY tiling process. These systems prevent the common issue of lippage, where tiles are uneven, creating an unsightly and uneven surface. They consist of clips and wedges that hold the tiles in place while the adhesive dries. “For large format tiles, a levelling system is a game-changer,” states DIY blogger Emily Clark. “It ensures that all tiles are perfectly aligned, which is crucial for both aesthetics and safety.”
These systems are particularly beneficial when working with large tiles, which are more prone to uneven placement. By keeping the tiles level, they ensure a uniform finish, enhancing the overall look of the tiled area.
The Versatile Tile Nipper for Intricate Cuts
Tile nippers are essential for making small cuts or adjustments, particularly around fixtures or irregular spaces. They are perfect for cutting small sections of tile to fit around pipes or corners. According to DIY expert Tom Harris, “Tile nippers are like the fine-tuning tool of tiling. They allow for detailed work that a tile cutter can’t achieve.”
Using tile nippers requires some practice to avoid breaking the tile. It’s recommended to score the tile first with a cutter and then use the nippers to carefully snap off the excess.
The Role of a Notched Trowel in Adhesive Application
A notched trowel is used to apply tile adhesive onto the surface. Its notches create grooves in the adhesive, ensuring better grip and adhesion of the tiles. The size of the notches depends on the size of the tile being installed. Larger tiles require larger notches to provide adequate support. “The notched trowel is critical for ensuring that tiles adhere properly,” notes construction specialist Mark Davies. “Without it, tiles may not stick correctly, leading to potential issues down the line.”
The technique involves spreading the adhesive with the flat side of the trowel before using the notched side to create the grooves. This method ensures an even layer of adhesive, which is key for durability.
Spacers for Consistent Gaps
Tile spacers are small, cross-shaped pieces that ensure consistent spacing between tiles. They are crucial for maintaining uniform gaps, which is essential for both aesthetics and structural integrity. “Spacers are the unsung heroes of tiling,” says interior designer Rachel Lee. “They ensure that grout lines are even, which is important for the overall look and function of the tiled area.”
Different sizes of spacers are available, depending on the desired width of the grout lines. Choosing the right size is important for achieving the desired look and ensuring that the tiles are properly aligned.
Looking Ahead: The Future of DIY Tiling
As the DIY movement grows, so too does the availability and innovation of tools designed to make home improvement projects more accessible. For those considering a tiling project, understanding and investing in the right tools is the first step towards success. With the right equipment, even complex tiling projects become manageable, allowing homeowners to add personal touches to their spaces with confidence. As technology advances, we can expect further improvements in tool design, making DIY tiling easier and more efficient than ever before.